图像去雾

效果展示

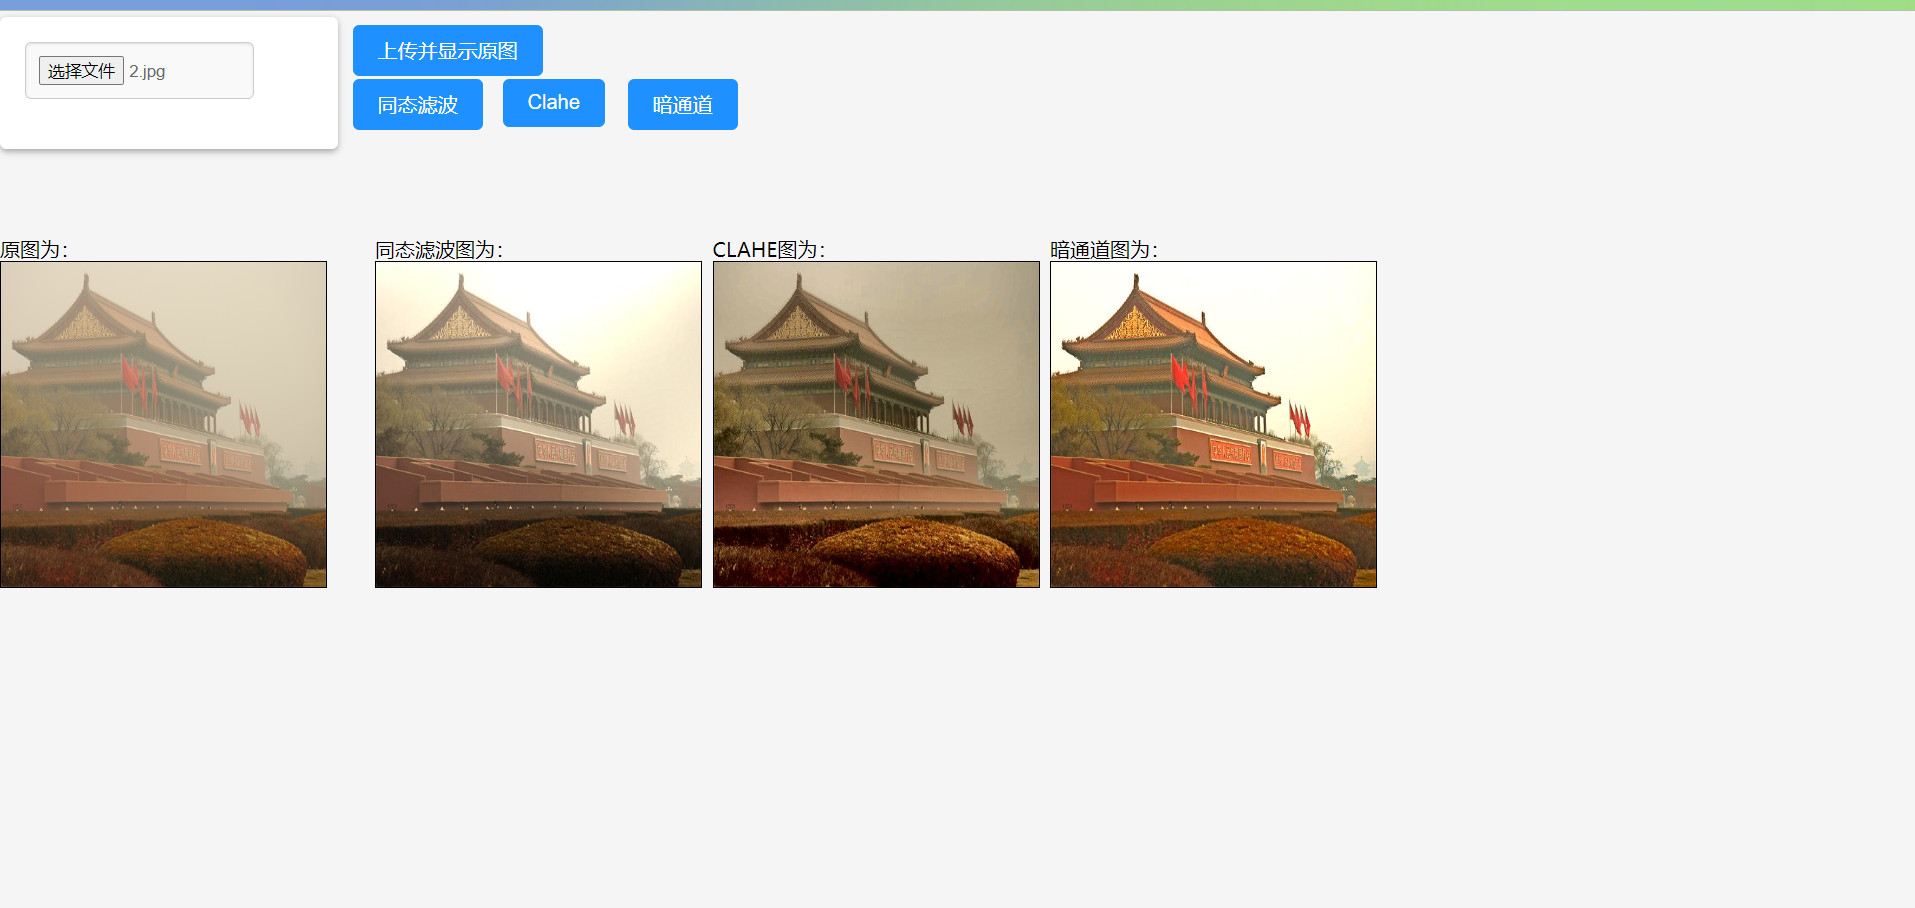
本代码为数字图像处理课程的课堂展示作业,展示内容为用不同的方法对图像去雾。

图像去雾展示图

前后端代码

1
2
3
4
5
6
7
8
9
10
11
12
13
14
15
16
17
18
19
20
21
22
23
24
25
26
27
28
29
30
31
32
33
34
35
36
37
38
39
40
41
42
43
44
45
46
47
48
49
package com.xiaoguan.imageprocess;

import AnTongDao.AnTongDao;
import CLAHE.Clahe;
import QuWu.TaongTaiQuWu;
import ShiShiQuWu.ShiShiQuWu;
import com.mathworks.toolbox.javabuilder.MWException;

public class Defogging {
public Defogging() {
}
public static void tongTaiLvBoQuWu(String srcPath,String targetPath){
System.out.println("进入同态滤波算法函数");
try {
TaongTaiQuWu taongTaiQuWu = new TaongTaiQuWu();
taongTaiQuWu.tongTaiLvBo(1,srcPath,targetPath);
} catch (MWException e) {
e.printStackTrace();
}
}
public static void clahe(String srcPath,String targetPath){
System.out.println("进入clahe函数");
try {
Clahe clahe = new Clahe();
clahe.CLAHE(1,srcPath,targetPath);
} catch (MWException e) {
e.printStackTrace();
}
}
public static void anTongDao(String srcPath,String targetPath){
System.out.println("进入anTongDao函数");
try {
AnTongDao anTongDao = new AnTongDao();
anTongDao.anTongDao(1,srcPath,targetPath);
} catch (MWException e) {
e.printStackTrace();
}
}
public static void shiShiQuWu(String srcPath,String targetPath){
System.out.println("进入shishiQuWu函数");
try {
ShiShiQuWu shiShiQuWu = new ShiShiQuWu();
shiShiQuWu.shiShiQuWu(1,srcPath,targetPath);
} catch (MWException e) {
e.printStackTrace();
}
}
}

1
2
3
4
5
6
7
8
9
10
11
12
13
14
15
16
17
18
19
20
21
22
23
24
25
26
27
28
29
30
31
32
33
34
35
36
37
38
39
40
41
42
43
44
45
46
47
48
49
50
51
52
53
54
55
56
57
58
59
60
61
62
package com.xiaoguan.imgstoreandsend;

import com.xiaoguan.imageprocess.Defogging;

import javax.servlet.ServletException;
import javax.servlet.annotation.WebServlet;
import javax.servlet.http.HttpServlet;
import javax.servlet.http.HttpServletRequest;
import javax.servlet.http.HttpServletResponse;
import java.io.IOException;
import java.io.PrintWriter;

@WebServlet("/image/send")
public class ImageSendServlet extends HttpServlet {
@Override
protected void service(HttpServletRequest request, HttpServletResponse response) throws ServletException, IOException {
String sourcePath =(String) request.getAttribute("sourcePath");
String filename = (String) request.getAttribute("filename");
String requestPath = (String) request.getAttribute("requestPath");
if("/image/store".equals(requestPath)){
response.setContentType("text/html;charset=UTF-8");
PrintWriter out = response.getWriter();
String json="{\"imageURL\":\""+request.getContextPath()+"/image/source/"+filename+"\"}";
out.print(json);
System.out.println("原图响应成功");
}else if("/image/tongTaiLvBo".equals(requestPath)){
String targetPath="E:/java/ImageProcessHomework/out/artifacts/Defogging/image/process/TongTaiLvBo";
Defogging.tongTaiLvBoQuWu(sourcePath+"/"+filename,targetPath+"/"+filename);
response.setContentType("text/html;charset=UTF-8");
PrintWriter out = response.getWriter();
String json="{\"imageURL\":\""+request.getContextPath()+"/image/process/TongTaiLvBo/"+filename+"\"}";
out.print(json);
System.out.println("同态滤波图片响应成功");
}else if("/image/clahe".equals(requestPath)){
String targetPath="E:/java/ImageProcessHomework/out/artifacts/Defogging/image/process/Clahe";
Defogging.clahe(sourcePath+"/"+filename,targetPath+"/"+filename);
response.setContentType("text/html;charset=UTF-8");
PrintWriter out = response.getWriter();
String json="{\"imageURL\":\""+request.getContextPath()+"/image/process/Clahe/"+filename+"\"}";
out.print(json);
System.out.println("Clahe图片响应成功");
}else if("/image/anTongDao".equals(requestPath)){
String targetPath="E:/java/ImageProcessHomework/out/artifacts/Defogging/image/process/anTongDao";
Defogging.anTongDao(sourcePath+"/"+filename,targetPath+"/"+filename);
response.setContentType("text/html;charset=UTF-8");
PrintWriter out = response.getWriter();
String json="{\"imageURL\":\""+request.getContextPath()+"/image/process/anTongDao/"+filename+"\"}";
out.print(json);
System.out.println("暗通道图片响应成功");
}else if ("/image/shiShiQuWu".equals(requestPath)){
String targetPath="E:/java/ImageProcessHomework/out/artifacts/Defogging/image/process/shiShiQuWu";
Defogging.shiShiQuWu(sourcePath+"/"+filename,targetPath+"/"+filename);
response.setContentType("text/html;charset=UTF-8");
PrintWriter out = response.getWriter();
String json="{\"imageURL\":\""+request.getContextPath()+"/image/process/shiShiQuWu/"+filename+"\"}";
out.print(json);
System.out.println("实时去雾图片响应成功");
}

}
}

1
2
3
4
5
6
7
8
9
10
11
12
13
14
15
16
17
18
19
20
21
22
23
24
25
26
27
28
29
30
31
32
33
34
35
36
37
38
39
40
41
42
43
44
45
46
47
48
49
50
51
52
53
54
55
56
57
package com.xiaoguan.imgstoreandsend;


import com.xiaoguan.imageprocess.Defogging;
import org.apache.commons.fileupload.FileItem;
import org.apache.commons.fileupload.FileUploadException;
import org.apache.commons.fileupload.disk.DiskFileItemFactory;
import org.apache.commons.fileupload.servlet.ServletFileUpload;

import javax.servlet.ServletException;
import javax.servlet.annotation.WebServlet;
import javax.servlet.http.HttpServlet;
import javax.servlet.http.HttpServletRequest;
import javax.servlet.http.HttpServletResponse;
import java.io.File;
import java.io.IOException;
import java.util.List;

@WebServlet({"/image/store","/image/tongTaiLvBo","/image/clahe","/image/anTongDao","/image/shiShiQuWu"})
public class ImageStoreServlet extends HttpServlet {
@Override
protected void doPost(HttpServletRequest request, HttpServletResponse response) throws ServletException, IOException {
DiskFileItemFactory diskFileItemFactory = new DiskFileItemFactory();
ServletFileUpload servletFileUpload = new ServletFileUpload(diskFileItemFactory);
String filename=null;
String sourcePath=null;
try {
List<FileItem> fileItems = servletFileUpload.parseRequest(request);
for(FileItem fileItem:fileItems){
if(fileItem.isFormField())
{
System.out.println("其他情况");
}else {
sourcePath = request.getServletContext().getRealPath("image")+"/source";
long l = System.currentTimeMillis();
String uuid=l+"_";
filename=uuid+fileItem.getName();
File image = new File(sourcePath, filename);
fileItem.write(image);
System.out.println("图片写入成功!");
System.out.println(sourcePath);
System.out.println("haha");
}
}
} catch (FileUploadException e) {
System.out.println("文件加载错误");
} catch (Exception e) {
e.printStackTrace();
}
request.setAttribute("sourcePath",sourcePath);
request.setAttribute("filename",filename);
request.setAttribute("requestPath",request.getServletPath());
request.getRequestDispatcher("/image/send").forward(request,response);
}
}

1
2
3
4
5
6
7
8
9
10
11
12
13
14
15
16
17
18
19
20
21
22
23
24
25
26
27
28
29
30
31
32
33
34
35
36
37
38
39
40
41
42
43
44
45
46
47
48
49
50
51
52
53
54
55
56
57
58
59
60
61
62
63
64
65
66
67
68
69
70
71
72
73
74
75
76
77
78
79
80
81
82
83
84
85
86
87
88
89
90
91
92
93
94
95
96
97
98
99
100
101
102
103
104
105
106
107
108
109
110
111
112
113
114
115
116
117
118
119
120
121
122
123
124
125
126
127
128
129
130
131
132
133
134
135
136
137
138
139
140
141
142
143
144
145
146
<!DOCTYPE html>
<html lang="ch">
<head>
<meta charset="UTF-8">
<title>Upload Image</title>
<style>
input[type="file"] {
display: block;
margin-bottom: 20px ;
padding: 10px;
border: 1px solid #ccc;
border-radius: 5px;
color: #666;
background-color: #f9f9f9;
box-shadow: inset 0 1px 2px rgba(0,0,0,0.1);
cursor: pointer;
max-width:70%;
}
form {
width: 15%;
margin: 50px auto;
background-color: #fff;
padding: 20px;
border-radius: 5px;
box-shadow: 0 2px 5px rgba(0,0,0,0.3);
position: fixed;
top: -45px;
left: 0;
}
input[type="button"] {
background-color: dodgerblue;
border: none;
color: white;
padding: 10px 20px;
text-align: center;
text-decoration: none;
display: inline-block;
font-size: 16px;
margin: 4px 2px;
cursor: pointer;
border-radius: 5px;
}
body{
/* 方便演示,居中显示 */
height: 10vh;
display: flex;
justify-content: center;
align-items: center;
background-color: whitesmoke;
}
.pic{
width: 260px;
height: 260px;
border: 1px
solid black;
background-color: cornflowerblue;
}
.pics{
max-width: 100%;
max-height: 100%;
}
</style>
<script>
function imageProcess(path,imgId){
var fileInput = document.getElementById('file');
if (checkImage()) {
var file = fileInput.files[0];
var formData = new FormData();
formData.append('image', file, file.name);
var xhr = new XMLHttpRequest();
xhr.onreadystatechange=function () {
if(this.readyState===4){
if(this.status===200){
var urlInfo = JSON.parse(this.responseText);
document.getElementById(imgId).src=urlInfo.imageURL;
} else {
alert(this.status);
}
}
}
xhr.open('POST', '/Defogging1_war_exploded'+path+'', true);
xhr.send(formData);
alert('图片上传成功!');
}
}
function checkImage() {
var fileInput = document.getElementById('file');
var filePath = fileInput.value;
var allowedExtensions = /(\.jpg|\.jpeg|\.png)$/i;
if (!allowedExtensions.exec(filePath)) {
alert('请上传正确的图片!');
fileInput.value = '';
return false;
}
else {
return true;
}
}
</script>
</head>
<body>
<form enctype="multipart/form-data" method="post">
<input type="file" id="file" name="file" >
</form>

<span style="position: absolute; top: 7px; left: 280px;"> <input type="button" value="上传并显示原图" id="srcImg" onclick=imageProcess("/image/store","imgs")></span>
<span style="position: absolute; top: 180px; left: 0px; ">原图为:</span>
<span style="position: absolute; top: 180px; left: 300px; ">同态滤波图为:</span>
<span style="position: absolute; top: 180px; left: 570px; ">CLAHE图为:</span>
<span style="position: absolute; top: 180px; left: 840px; ">暗通道图为:</span>
<span style="position: absolute; top: 180px; left: 1110px; ">实时去雾图为:</span>

<div style="position: absolute; top: 200px; left: 0px; " class="pic">
<img id="imgs" alt=""
src="/Defogging/image/init/backpic.jpg"
width="260px" height="260px" class="pics"/>
</div>
<span style="position: absolute; top: 50px; left: 280px;"> <input type="button" value="同态滤波" id="uploadImage1" onclick=imageProcess("/image/tongTaiLvBo","imgp1")></span>
<div style="position: absolute; top: 200px; left: 300px;" class="pic">
<img id="imgp1" alt=""
src="/Defogging/image/init/backpic.jpg"
width="260px" height="260px" class="pics"/>
</div>
<span style="position: absolute; top: 50px; left: 400px;"> <input type="button" value="Clahe" id="uploadImage2" onclick=imageProcess("/image/clahe","imgp2")></span>
<div style="position: absolute; top: 200px; left: 570px;" class="pic">
<img id="imgp2" alt=""
src="/Defogging/image/init/backpic.jpg"
width="260px" height="260px" class="pics"/>
</div>
<span style="position: absolute; top: 50px; left: 500px;"> <input type="button" value="暗通道" id="uploadImage3" onclick=imageProcess("/image/anTongDao","imgp3")></span>
<div style="position: absolute; top: 200px; left: 840px;" class="pic">
<img id="imgp3" alt=""
src="/Defogging/image/init/backpic.jpg"
width="260px" height="260px" class="pics"/>
</div>
<span style="position: absolute; top: 7px; left: 450px;"> <input type="button" value="实时去雾" id="uploadImage4" onclick=imageProcess("/image/shiShiQuWu","imgp4")></span>
<div style="position: absolute; top: 200px; left: 1110px;" class="pic">
<img id="imgp4" alt=""
src="/Defogging/image/init/backpic.jpg"
width="260px" height="260px" class="pics"/>
</div>


</body>
</html>

matlab部分核心去雾代码

1
2
3
4
5
6
7
8
9
10
11
12
13
14
15
16
17
18
19
20
21
22
23
24
25
26
27
28
29
30
31
32
33
34
35
36
37
38
39
40
41
42
43
44
45
46
47
48
49
%%%%%%%%%%%%%%%%%%%%%%%%%%%%%%%%%%%%%
% My_homofilter:同态滤波算法
% 输入:灰度图I_mean
% 输出:同态滤波后的灰度图output
%%%%%%%%%%%%%%%%%%%%%%%%%%%%%%%%%%%%%

function [output] = My_homofilter(I_mean)
%% 第一步 取对数并进行傅里叶变换
I_log = log(I_mean+1);
% 傅里叶变换
I_fft = fft2(I_log);
I_fft = fftshift(I_fft);

%% 第二步 频域高斯高通滤波

% 高斯滤波器的参数
L = 0.3;
H = 1.8;
C = 2;
% 截止频率D0
D0 = 1;

% 生成mask
[height,width] = size(I_mean);
mask = zeros(height,width);
for i=1:height
for j=1:width
% 根据距离中心的距离来
D = sqrt(((i-height/2)^2+(j-width/2)^2));
mask(i,j) = (H-L)*(1-exp(C*(-D/(D0))))+L; %高斯同态滤波
end
end
% % 显示mask的图像
% figure;
% imshow(mask,[]);
% title('mask的图像');

% 用mask进行点乘
I_fft_gauss = mask.*I_fft;

%% 第三步 傅里叶逆变换并取指数
I_fft_gauss = ifftshift(I_fft_gauss);

I_ifft = ifft2(I_fft_gauss);
% 取指数,恢复原图
I_gray_defog = real(exp(I_ifft)+1);

output = I_gray_defog;
end
1
2
3
4
5
6
7
8
9
10
11
12
13
14
15
16
17
18
19
20
21
22
23
24
25
26
27
28
29
30
31
32
33
34
35
36
37
38
39
40
41
42
43
44
45
46
47
48
49
50
%% 鲁棒性测试——基于同态滤波的去雾算法

tic
%% 清空工作区与变量
clc;
clear;
image_number=2;
imageName=strcat(num2str(image_number),'.jpg');
I = imread(imageName);
figure;
imshow(I);
title(['第',num2str(image_number),'幅图像的原图']);

%% 进行同态滤波
% 取三个通道的平均灰度作为参照
I_mean = mean(I,3);
% 去double方便对数运算
I_mean = im2double(I_mean);

% 调用同态滤波函数
I_gray_defog = My_homofilter(I_mean);

% 归一化到[0,1]
max_pixel = max(max(I_gray_defog));
I_gray_defog = mat2gray(I_gray_defog,[0,max_pixel]);

%% 利用同态滤波后的平均灰度来映射
% 分三个通道
I_defog = zeros(size(I));
for i = 1:3
% 用去雾的平均灰度来映射
I_defog(:,:,i) = (double(I(:,:,i)).*I_gray_defog)./I_mean ;
end

% 归一化到[0,1]
max_pixel = max( max( max(I_defog) ) );
min_pixel = min( min( min(I_defog) ) );
I_defog = mat2gray(I_defog,[min_pixel,max_pixel]);
% 提升亮度
I_defog = 1.35.*I_defog;

%% 输出图像
figure;
imshow(I_defog,[]);
title(['第',num2str(image_number),'幅图像的去雾图像']);
imwrite(I_defog,'D:/bb.jpg');
clc;
clear;
toc

1
2
3
4
5
6
7
8
9
10
11
12
13
14
15
16
17
18
19
20
21
22
23
24
25
26
27
28
29
30
31
32
33
34
35
36
37
38
39
40
41
42
43
44
45
46
47
48
49
50
51
52
53
54
55
56
57
58
59
60
61
62
63
64
65
66
67
68
69
70
71
72
73
74
75
76
77
78
79
80
81
82
83
84
85
86
87
88
89
90
91
92
93
94
95
96
97
98
99
100
101
102
103
104
105
106
107
108
109
110
111
112
113
114
115
116
117
118
119
120
121
122
123
124
125
126
127
128
129
130
131
132
133
134
135
136
137
138
139
140
141
142
143
144
145
146
147
148
149
%%%%%%%%%%%%%%%%%%%%%%%%%%%%%%%%%%%%%%%%%%%%%%
% My_adapthisteq:限制对比度的自适应直方图算法
% 输入:灰度图I_gray
% 输出:均衡化后的灰度图output
%%%%%%%%%%%%%%%%%%%%%%%%%%%%%%%%%%%%%%%%%%%%%

function [output] = My_adapthisteq(I_gray)
%% 第一步 获取图片基本信息
[height,width] = size(I_gray);
% 获取最大最小像素
min_pixel = double(min(min(I_gray)));
max_pixel = double(max(max(I_gray)));

%% 第二步 对图片进行分块
% |-------Y
% |
% |
% X
% 根据经验按照图片尺寸分成若干个子块
% Y分为(width/100-2)个子块
subpart_Y = floor(width/100)-2;
% X分为(height/100-1)个子块
subpart_X = floor(height/100)-1;
% 子块的宽和高
height_size = ceil(height/subpart_X);
width_size = ceil(width/subpart_Y);

% 不能保证整除,需要补零
delta_y = subpart_X*height_size - height;
delta_x = subpart_Y*width_size - width;

% 补零
temp_Image = zeros(height+delta_y,width+delta_x);
temp_Image(1:height,1:width) = I_gray;

% 新的高和宽
new_width = width + delta_x;
new_height = height + delta_y;
% 像素点总数
sum_pixels = width_size * width_size;

%% 第三步 建立Look-up-table
% 像素容器的总数,决定直方图横轴的间隔
sum_pixel_bins = 256;
% 建立Look-Up-Table
look_up_table = zeros(max_pixel+1,1);

% 通过输入的灰度值范围进行映射
for i = min_pixel:max_pixel
look_up_table(i+1) = fix(i - min_pixel);
end

%% 第四步 为每个子块建立直方图
% 归一化整幅图的灰度值
% 使用Look-up-table
pixel_bin = zeros(new_height, new_width);
for m = 1 : new_height
for n = 1 : new_width
pixel_bin(m,n) = 1 + look_up_table(temp_Image(m,n) + 1);
end
end

% Hist为长度256的4*8矩阵,用来存储直方图
% 4*8表示划分成了4*8个子块,256表示灰度级
% Hist(x,y,i)表示
% (在划分的坐标为(x,y)的子块中,像素值=i的像素点)的总数
Hist = zeros(subpart_X, subpart_Y, 256);
for i=1:subpart_X
for j=1:subpart_Y
% 为每个子块建立直方图
tmp = uint8(pixel_bin(1+(i-1)*height_size:i*height_size, 1+(j-1)*width_size:j*width_size));
[Hist(i, j, :), x] = imhist(tmp, 256);
end
end
% 调整灰度值的那一维
Hist = circshift(Hist,[0, 0, -1]);

%% 第五步 剪裁直方图
% 剪裁参数
clip_limit = 2.5;
clip_limit = max(1,clip_limit * height_size * width_size/sum_pixel_bins);

% 调用剪裁函数
Hist = My_clip_histogram(Hist,sum_pixel_bins,clip_limit,subpart_X,subpart_Y);

%% 第六步 灰度值映射和线性插值处理
Map = My_map_histogram(Hist, min_pixel, max_pixel, sum_pixel_bins, sum_pixels, subpart_X, subpart_Y);
y_I = 1;
for i = 1:subpart_X+1
% 单独处理边界
if i == 1
sub_Y = floor(height_size/2);
y_Up = 1;
y_Bottom = 1;
elseif i == subpart_X+1
sub_Y = floor(height_size/2);
y_Up = subpart_X;
y_Bottom = subpart_X;
% 否则在内部
else
sub_Y = height_size;
y_Up = i - 1;
y_Bottom = i;
end
xI = 1;
% 单独处理边界
for j = 1:subpart_Y+1
if j == 1
sub_X = floor(width_size/2);
x_Left = 1;
x_Right = 1;
elseif j == subpart_Y+1
sub_X = floor(width_size/2);
x_Left = subpart_Y;
x_Right = subpart_Y;
% 否则在内部
else
sub_X = width_size;
x_Left = j - 1;
x_Right = j;
end
% 进行灰度值映射
U_L = Map(y_Up,x_Left,:);
U_R = Map(y_Up,x_Right,:);
B_L = Map(y_Bottom,x_Left,:);
B_R = Map(y_Bottom,x_Right,:);
sub_Image = pixel_bin(y_I:y_I+sub_Y-1,xI:xI+sub_X-1);

% 线性插值处理
s_Image = zeros(size(sub_Image));
num = sub_Y * sub_X;
for m = 0:sub_Y - 1
inverse_I = sub_Y - m;
for n = 0:sub_X - 1
inverse_J = sub_X - n;
val = sub_Image(m+1,n+1);
s_Image(m+1, n+1) = (inverse_I*(inverse_J*U_L(val) + n*U_R(val)) ...
+ m*(inverse_J*B_L(val) + n*B_R(val)))/num;
end
end
output(y_I:y_I+sub_Y-1, xI:xI+sub_X-1) = s_Image;
xI = xI + sub_X;
end
y_I = y_I + sub_Y;
end

%% 第七步 输出非补零的部分
output = output(1:height, 1:width);
end
1
2
3
4
5
6
7
8
9
10
11
12
13
14
15
16
17
18
19
20
21
22
23
24
25
26
27
28
29
30
31
32
33
34
35
36
37
38
39
40
41
42
43
44
45
46
47
48
49
50
51
52
53
54
55
56
57
58
59
60
61
62
63
64
65
66
67
%%%%%%%%%%%%%%%%%%%%%%%%%%%%%%%%%%%%%%%%%%%%%%%%%%%%%%%%%%%%%%%
% My_adapthisteq:剪裁函数,用于剪裁直方图并且重新分配像素值,
% 可以把超过Clip_limit的像素值均匀分配到直方图
% 的其他位置
% 输入:输入直方图Hist
% 直方图横轴总数sum_pixel_bin
% 剪裁阈值Clip_limit
% 高分成的子块数subpart_X
% 宽分成的子块数subpart_Y
% 输出:剪裁后的直方图Hist
%%%%%%%%%%%%%%%%%%%%%%%%%%%%%%%%%%%%%%%%%%%%%%%%%%%%%%%%%%%%%%%

function [Hist] = My_clip_histogram(Hist,sum_pixel_bin,clip_limit,subpart_X,subpart_Y)

for i = 1:subpart_X
for j = 1:subpart_Y
%% 第一步 计算超过阈值的像素值总数
sum_excess = 0;
for nr = 1:sum_pixel_bin
excess = Hist(i,j,nr) - clip_limit;
if excess > 0
sum_excess = sum_excess + excess;
end
end

%% 第二步 剪裁并重建直方图
% 平均超过的像素值
bin_averate = sum_excess / sum_pixel_bin;
% 上限,保证重建的直方图不超过阈值
upper = clip_limit - bin_averate;
for nr = 1:sum_pixel_bin
% 若大于阈值,直接裁掉
if Hist(i,j,nr) > clip_limit
Hist(i,j,nr) = clip_limit;
else
% 否则,若大于上限,把这些像素值设为阈值
if Hist(i,j,nr) > upper
% 从总数中减去
sum_excess = sum_excess + upper - Hist(i,j,nr);
Hist(i,j,nr) = clip_limit;
else
% 否则,若小于上限,则加上平均超过的像素值
sum_excess = sum_excess - bin_averate;
Hist(i,j,nr) = Hist(i,j,nr) + bin_averate;
end
end
end

% 若超过像素值总数大于零,再平均分给每一个像素值
if sum_excess > 0
% 计算步长
step_size = max(1,fix(1+sum_excess/sum_pixel_bin));
% 从最小灰度级到最大灰度级按照步长循环搜索
for nr = 1:sum_pixel_bin
sum_excess = sum_excess - step_size;
Hist(i,j,nr) = Hist(i,j,nr) + step_size;
% 若小于1,循环结束
if sum_excess < 1
break;
end
end
end

end
end
end

1
2
3
4
5
6
7
8
9
10
11
12
13
14
15
16
17
18
19
20
21
22
23
24
25
26
27
28
%%%%%%%%%%%%%%%%%%%%%%%%%%%%%%%%%%%%%%%%%%%%%%%%%%%%%%%%%%%%%%%
% My_adapthisteq:计算重分配的look_up_table,范围从min_pixel到
% max_pixel
% 输入:输入直方图Hist
% 灰度值上下限min_pixel,max_pixel
% 像素点总数
% 直方图横轴总数sum_pixel_bin
% 高分成的子块数subpart_X
% 宽分成的子块数subpart_Y
% 输出:重分配的look_up_tabl
%%%%%%%%%%%%%%%%%%%%%%%%%%%%%%%%%%%%%%%%%%%%%%%%%%%%%%%%%%%%%%%

function [output] = My_map_histogram(Hist,min_pixel,max_pixel,sum_pixel_bins,sum_pixels,subpart_X,subpart_Y)
output=zeros(subpart_X,subpart_Y,sum_pixel_bins);
scale = (max_pixel - min_pixel)/sum_pixels;
% 遍历计算
for i = 1:subpart_X
for j = 1:subpart_Y
sum = 0;
for nr = 1:sum_pixel_bins
sum = sum + Hist(i,j,nr);
output(i,j,nr) = fix( min( min_pixel + sum*scale,max_pixel ) );
end
end
end
end


1
2
3
4
5
6
7
8
9
10
11
12
13
14
15
16
17
18
19
20
21
22
23
24
25
26
27
28
29
30
31
32
33
34
35
36
37
38
39
40
%% 鲁棒性测试——基于局部对比度增强的CLAHE算法
tic

%% 清空工作区与变量
clc;
clear;
for image_number=1:8
imageName=strcat(num2str(image_number),'.jpg');
img = imread(imageName);
figure;
imshow(img);
title(['第',num2str(image_number),'幅图像的原图']);

%% 在LAB空间进行去雾

% RGB转LAB
transform = makecform('srgb2lab');
LAB = applycform(img,transform);

% 提取亮度分量 L
L = LAB(:,:,1);

% 对L进行CLAHE
LAB(:,:,1) = My_adapthisteq(L);
% 减小一定的亮度
LAB(:,:,1) = LAB(:,:,1)-50;

%% 转回到RGB空间
cform2srgb = makecform('lab2srgb');
J = applycform(LAB, cform2srgb);

%% 输出图像
figure;
J = 1.35.*J;
imshow(J);
title(['第',num2str(image_number),'幅图像的去雾图像']);
clc;
clear;
end
toc
1
2
3
4
5
6
7
8
9
10
11
12
13
14
15
16
17
18
19
20
21
22
23
24
25
26
27
28
29
30
%%%%%%%%%%%%%%%%%%%%%%%%%%%%%%%%%%%%%%%%%%%%%
% Cumulative_sum:计算指定半径的累积和
%%%%%%%%%%%%%%%%%%%%%%%%%%%%%%%%%%%%%%%%%%%%%
function Cumulative_sum = My_cumulative_sum(input, r)

% output(x, y)=sum(sum(imSrc(x-r:x+r,y-r:y+r)));
% 和colfilt(imSrc, [2*r+1, 2*r+1], 'sliding', @sum)函数实现一样的功能,但是速度非常快;


[height, width] = size(input);
Cumulative_sum = zeros(size(input));

% 计算列的累积和
cumulative = cumsum(input, 1);
% 计算列的导数
Cumulative_sum(1:r+1, :) = cumulative(1+r:2*r+1, :);
Cumulative_sum(r+2:height-r, :) = cumulative(2*r+2:height, :) - cumulative(1:height-2*r-1, :);
Cumulative_sum(height-r+1:height, :) = repmat(cumulative(height, :), [r, 1]) ...
- cumulative(height-2*r:height-r-1, :);

% 计算行的累积和
cumulative = cumsum(Cumulative_sum, 2);
% 计算行的导数
Cumulative_sum(:, 1:r+1) = cumulative(:, 1+r:2*r+1);
Cumulative_sum(:, r+2:width-r) = cumulative(:, 2*r+2:width) - cumulative(:, 1:width-2*r-1);
Cumulative_sum(:, width-r+1:width) = repmat(cumulative(:, width), [1, r])...
- cumulative(:, width-2*r:width-r-1);
end


1
2
3
4
5
6
7
8
9
10
11
12
13
14
15
16
17
18
19
20
21
22
23
24
25
26
27
28
29
30
31
32
33
34
%%%%%%%%%%%%%%%%%%%%%%%%%%%%%%%%%%%%%%%%%%%%%
% My_darkchannel:求暗通道
% 输入:
% I:输入RGB图像
% window_size:暗通道最小值滤波的窗口大小
% 输出:output:暗通道
%%%%%%%%%%%%%%%%%%%%%%%%%%%%%%%%%%%%%%%%%%%%%


function [output] = My_darkchannel(I,window_size)

%% 第一步 读取图像信息
% 获取图像大小和维度
[height,width,~] = size(I);
% 初始化暗通道图像
dark_channel = ones(height,width);

%% 第二步 获取每个像素点三个通道的最小值
for i = 1:height
for j = 1:width
% 获取像素点位置三个通道的最小值
dark_channel(i,j) = min( I(i,j,:) );

end
end

%% 第三步 最小值滤波
% 调用My_minfilter函数进行最小值滤波
min_dark_channel = My_minfilter(dark_channel,window_size);

%% 第四步 输出暗通道
output = min_dark_channel;

end
1
2
3
4
5
6
7
8
9
10
11
12
13
14
15
16
17
18
19
20
21
22
23
24
25
26
27
28
29
30
31
32
33
34
35
36
37
38
39
40
41
42
43
44
45
46
%%%%%%%%%%%%%%%%%%%%%%%%%%%%%%%%%%%%%%%%%%%%%
% My_estimateA:估计全局大气光A
% 输入:
% I:输入RGB图像
% dark_channel:I的暗通道
% 输出:output:RGB三个通道的全局大气光A
%%%%%%%%%%%%%%%%%%%%%%%%%%%%%%%%%%%%%%%%%%%%%

function [output] = My_estimateA(I,dark_channel)

%% 第一步 初始化A并读取信息
A = zeros(1,1,3);
[height,width] = size(dark_channel);


% 一共要取的点个数(亮度值前0.1%一共点数)
points_number = round(width * height * 0.001);
% 下面从最亮点中计算A的值
% 从零开始迭代
for k = 1:points_number

%% 第二步 取出dark_channel里的亮点
brightest_points = max( max(dark_channel) );
[i,j] = find (dark_channel==brightest_points);
% 可能有多个最亮点,取第一个即可
i = i(1);
j = j(1);
% 将此最亮点置0,方便找寻第二亮的点
dark_channel(i,j) = 0;

%% 第三步 根据亮点的位置计算A值
% 在原图中对应位置找到它的亮度值
% 对三个通道取平均
% 若大于A,则更新A的值
if(mean( I(i,j,:) )>mean(A(1,1,:)))
% 分别记录三个通道的A值
A(1,1,1) = (A(1,1,1)+I(i,j,1))/2;
A(1,1,2) = (A(1,1,2)+I(i,j,2))/2;
A(1,1,3) = (A(1,1,3)+I(i,j,3))/2;
end
end

%% 第四步 输出A
output = A;
end
1
2
3
4
5
6
7
8
9
10
11
12
13
14
15
16
17
18
19
20
21
22
23
24
25
26
27
28
29
30
31
32
33
34
35
36
37
38
39
40
41
42
43
44
%%%%%%%%%%%%%%%%%%%%%%%%%%%%%%%%%%%%%%%%%%%%%
% My_guidedfilter:导向滤波,优化投射率矩阵
% 输入:
% guide_image:向导图片
% I:滤波图片
% radius:滤波半径
% sooth_parameter:平滑程度
% 输出:output:优化的投射率矩阵
%%%%%%%%%%%%%%%%%%%%%%%%%%%%%%%%%%%%%%%%%%%%%

function [output] = My_guidedfilter(guide_image, I, radius, sooth_parameter)


[height, width] = size(guide_image);
% 投射率矩阵中半径radius的累积和,便于求平均
N = My_cumulative_sum(ones(height, width), radius);

% 向导图的平均
mean_guide = My_cumulative_sum(guide_image, radius) ./ N;
% 滤波图的平均
mean_I = My_cumulative_sum(I, radius) ./ N;
% 计算向导图和滤波图的积的平均
mean_IG = My_cumulative_sum(guide_image.*I, radius) ./ N;
% 计算向导图和滤波图的协方差
cov_IG = mean_IG - mean_guide .* mean_I;
% 计算向导图平方的平均
mean_II = My_cumulative_sum(guide_image.*guide_image, radius) ./ N;
% 计算滤波图片的方差
var_I = mean_II - mean_guide .* mean_guide;

% 求a
a = cov_IG ./ (var_I + sooth_parameter);
% 求b
b = mean_I - a .* mean_guide;

% 求a的平均
mean_a = My_cumulative_sum(a, radius) ./ N;
% 求b的平均
mean_b = My_cumulative_sum(b, radius) ./ N;

% 求q
q = mean_a .* guide_image + mean_b;
output = q;
end
1
2
3
4
5
6
7
8
9
10
11
12
13
14
15
16
17
18
19
20
21
22
23
24
25
26
27
28
29
30
31
32
33
34
35
36
37
38
39
40
41
42
43
%%%%%%%%%%%%%%%%%%%%%%%%%%%%%%%%%%%%%%%%%%%%%
% My_minfilter:最小值滤波
% 输入:
% I:输入灰度图像
% window_size:最小值滤波的窗口大小
% 输出:output:最小值滤波的暗通道图像
%%%%%%%%%%%%%%%%%%%%%%%%%%%%%%%%%%%%%%%%%%%%%


function [output] = My_minfilter(I,window_size)

%% 第一步 读取图像信息
I_new = I;
[height,width] = size(I);

%% 第二步 遍历循环,进行最小值化
for i = 1:height
for j = 1:width
% 处理边界,防止越界
i_down = i-window_size;
i_up = i+window_size;
j_down = j-window_size;
j_up = j+window_size;
if(i_down<=0)
i_down = 1;
end
if(j_down<=0)
j_down = 1;
end
if(i_up>height)
i_up = height;
end
if(j_up>width)
j_up = width;
end
% 最小值滤波,取窗口内的最小值作为当前像素点的值
I_new(i,j) = min (min(I(i_down:i_up,j_down:j_up)) );
end
end

%% 第三步 输出
output = I_new;
end
1
2
3
4
5
6
7
8
9
10
11
12
13
14
15
16
17
18
19
20
21
22
23
24
25
26
27
28
29
30
31
32
33
34
35
36
37
38
39
40
41
42
43
44
45
46
47
48
49
50
51
52
53
54
55
56
57
58
59
60
61
62
63
64
65
66
67
68
69
70
71
72
73
74
75
76
77
78
79
80
81
82
83
84
85
86
87
88
89
90
%% 鲁棒性测试——基于容差的暗通道先验去雾算法

tic
%% 第一步 读取图像,获得尺寸的基本信息
%清空
clear;
clc;
for image_number=1:8
imageName=strcat(num2str(image_number),'.jpg');
I = imread(imageName);
figure;
imshow(I,[]);
title(['第',num2str(image_number),'幅图像的原图']);

% 获取图像大小和维度
[height,width,dimention] = size(I);

%% 第二步 获取暗通道图像

% 最小值滤波窗口大小为 15 = 7*2+1
window_size = 7;
% 调用My_darkchannel函数
dark_channel = My_darkchannel(I,window_size);
dark_channel = dark_channel./255;

%% 第三步 计算大气光成分A
% A为1*1*3的矩阵,即提取出了RGB三个光照成分
I = im2double(I);
% 调用My_estimateA函数
A = My_estimateA(I,dark_channel);

%% 计算透射率矩阵t(x)
% 去雾完全系数,w = 1完全去雾
w = 0.95;

% 用暗通道估计透射率
t = 1-w*dark_channel/mean(A(1,1,:));

% 获取灰度图片
I_gray = rgb2gray(I);

% 用导向滤波对t进行优化
% 调用My_guidedfilter函数软抠图优化透射率矩阵
t1 = My_guidedfilter(I_gray, t, 135, 0.0002);

% 用导向滤波对投射率矩阵
% 进行保边缘模糊
t2 = My_guidedfilter(t1,t1,7,0.03);

% 透射图阈值,防止投射图很小的时候图像像素值过大
t_treshold = 0.1;
% 取t0=0.1防止整体向白场过度,小于0.1的值取0.1

t = max(t2,t_treshold);


%% 第四步 恢复无雾图像

% 引进容差
K = 0.2;
% 初始化去雾图像
defog_image = zeros(size(I));

% 用改进公式分三个通道进行去雾
defog_image(:,:,1) = ((I(:,:,1)-A(1,1,1))...
./min(1,t.*max( K./abs(I(:,:,1)-A(1,1,1)),1) ...
)) +A(1,1,1);
defog_image(:,:,2) = ((I(:,:,2)-A(1,1,2))...
./min(1,t.*max( K./abs(I(:,:,2)-A(1,1,2)),1) ...
)) +A(1,1,2);

defog_image(:,:,3) = ((I(:,:,3)-A(1,1,3))...
./min(1, t.*max( K./abs(I(:,:,3)-A(1,1,3)),1) ...
)) +A(1,1,3);


% dark channel prior方法会使图片变暗
% 乘系数使得图片亮
defog_image = defog_image*1.3;

%% 第五步 输出无雾图像
figure;
imshow(defog_image);
title(['第',num2str(image_number),'幅图像的去雾图像']);
clear;
clc;
end
toc


1
2
3
4
5
6
7
8
9
10
11
12
13
14
15
16
17
18
19
20
21
22
23
24
25
26
27
28
29
30
31
32
33
34
35
36
37
38
39
40
41
42
43
44
45
46
47
48
49
50
51
52
53
54
55
56
57
58
59
60
61
62
63
64
65
66
67
68
69
70
71
72
73
74
75
76
77
78
79
%% 鲁棒性测试——实时去雾算法
clc;
clear;
tic
for image_number=1:8
imageName=strcat(num2str(image_number),'.jpg');

%%
%%%%%%%%%%%%%%%%%%%%%%%%%%%%%%%%
% 第一步 读取图像并简单处理
%%%%%%%%%%%%%%%%%%%%%%%%%%%%%%%
I = imread(imageName);
figure;
imshow(I);
title(['第',num2str(image_number),'幅图像的原图']);

% 归一化到[0,1]
I = double(I)/255.0;

%%
%%%%%%%%%%%%%%%%%%%%%%%%%%%%%%%%%%%
% 第二步: 求取I的三个通道的最小值矩阵M
%%%%%%%%%%%%%%%%%%%%%%%%%%%%%%%%%%%
M = min(I,[],3);

%%
%%%%%%%%%%%%%%%%%%%%%%%%%%%%%%%%%%%
% 第三步: 对M进行均值滤波,得到Mave(x)
%%%%%%%%%%%%%%%%%%%%%%%%%%%%%%%%%%%
[height,width] = size(I);
mask = ceil(max(height, width) / 50);
if mod(mask, 2) == 0
mask = mask + 1;
end
f = fspecial('average', mask);
M_average = imfilter(M, f, 'symmetric');

%%
%%%%%%%%%%%%%%%%%%%%%%%%%%%%%%%%%%%
% 第四步: 求取M(x)中所有元素的均值Mav
%%%%%%%%%%%%%%%%%%%%%%%%%%%%%%%%%%%
[height, width] = size(M_average);
M_average_value = sum(sum(M_average)) / (height * width);

%%
%%%%%%%%%%%%%%%%%%%%%%%%%%%%%%%%%%%
% 第五步: 利用M_average求出环境光度 L
%%%%%%%%%%%%%%%%%%%%%%%%%%%%%%%%%%%
% delta值越大,去雾后的图像越暗,去雾效果越好
% delta值越小,去雾后的图像越白,去雾效果越差
delta = 2.0;
L = min ( min( delta*M_average_value,0.9)*M_average, M);

%%
%%%%%%%%%%%%%%%%%%%%%%%%%%%%%%%%%%%%%%%%%%
% 第六步: 利用M_average和I,求出全局大气光 A
%%%%%%%%%%%%%%%%%%%%%%%%%%%%%%%%%%%%%%%%%%
Matrix = [1;...
1;...
1];
A = 0.5 * ( max( max( max(I, [], 3) ) ) + max( max(M_average) ) )*Matrix;


%%
%%%%%%%%%%%%%%%%%%%%%%%%%%%%%%%%%%%%%%%%%%
% 第七步: 利用A、L和I求出去雾图
%%%%%%%%%%%%%%%%%%%%%%%%%%%%%%%%%%%%%%%%%%
[height, width, dimention] = size(I);
I_defog = zeros(height,width,dimention);
for i = 1:dimention
I_defog(:,:,i) = (I(:,:,i) - L) ./ (1 - L./A(i));
end
toc
figure;
imshow(I_defog);
title(['第',num2str(image_number),'幅图像的去雾图像']);
clc;
clear;
end